Using Clear Linux as a KVM Host
For most things that I want to accomplish in a Linux environment, I can generally either find the direct solution through a quick google search, or parse solutions to analogous problems and adapt them to my situation. However, I do not expect to find solutions for issues and configuration challenges I arrive at with Intel’s Clear Linux.
For those unfamiliar with Clear Linux, it is a Linux distribution with several optimizations for Intel processors. Some people refer to it as a “benchmark distribution” because it runs extremely quickly (arguably the fastest publicly available operating system in the world). It is also “bleeding edge” because it is a rolling distribution: it receives kernel and package changes from upstream sources within a matter of days or weeks. Larger Linux distributions such as Debian, Ubuntu, Red Hat, Centos etc. release a major version of the Linux Kernel every few years and keep the operating system there. Security updates and other essential features that are added to the main kernel after release are then “backported.” Clear Linux does not need to do this because it keeps the entire kernel up to date. I could make an entire separate post about Clear Linux and how it differs from other operating systems, but for now, this explanation will suffice.
Apart from being a relatively young distribution, Clear Linux does not have as many users compared to the more prominent Linux distros because (1) many applications do not support it, and (2) its design makes day to day usage less convenient than the likes of Ubuntu (however this has gotten better over time). This has a major impact: there exists significantly less community support around it, so finding guides or question/answers to projects I want to implement is more difficult. Therefore, in almost everything I do, I need to learn via adaptation from other OSs. This is includes running virtual machines.
KVM, a popular Linux method for running VMs, runs performantly because it resides within the kernel of the OS. It rivals the speed of a bare metal hypervisors (such as VMware). There exists ample documentation on running Clear Linux as a guest OS on KVM, however, little on using Clear Linux as the host for other virtual machines. The following guide goes over how I use Clear Linux as a KVM host. Installing KVM
I assume you already have a system running Clear Linux. To find out how to install it, please see Intel’s guide.
Add the following bundles:
1
sudo swupd bundle-add kernel-kvm kvm-host
The first installs virtualization features in the kernel, and the second installs packages that that allow you to manage a kvm instance.
To create virtual machines, you must either login as root or add your user to the kvm user group:
1
sudo usermod -aG kvm [username]
Finally, we will utilize libvirtd to manage the virtual machines. To enable this toolkit’s service:
1
sudo systemctl enable libvirtd
A quick reboot should make sure all components are enabled and ready for deployment. Configure Networking
By default, Clear Linux directly uses a wired adapter to connect to the network. However, we will need to configure a bridge to allow our virtual machines to receive their own IP addresses and communicate as their own entities. Clear Linux uses NetworkManager to manage interfaces. To list currently configured interfaces, run:
1
nmcli device status
Take note of the interface that you currently use for internet access. Mine was eno1
Now lets create a new bridge called br0:
1
sudo nmcli con add type bridge ifname br0 con-name br0
We will link it to the eno1 adapter for physical access:
1
sudo nmcli con add type bridge-slave ifname eno1 master br0
(Optional) Disabled STP for the bridge (we generally don’t need our bridge part of the network tree):
1
sudo nmcli con modify br0 bridge.stp no
By default, NetworkManager assumes you will use DHCP. However, to set a static IP (replacing the corresponding fields for your network):
1
sudo nmcli con modify br0 ipv4.method manual ipv4.address "[addr/prefix_bit_length]" ipv4.gateway"[gateway]" ipv4.dns 1.1.1.1 ipv4.dns-search "example.tld"
Now it’s time to bring down the the eno1 interface connection:
1
sudo nmcli con down eno1
And bring up the bridge:
1
sudo nmcli con up br0
Second to last, we need to prevent packets forwarded through the bridge from routing to the iptables of the host. We can append the following 3 lines to a new file for our bridge in /etc/sysctl.d/ directory:
1
sudo nano /etc/sysctl.d/0-bridge.conf
1
2
3
net.bridge.bridge-nf-call-arptables = 0
net.bridge.bridge-nf-call-ip6tables = 0
net.bridge.bridge-nf-call-iptables = 0
Finally, a restart of the system:
1
sudo reboot
And voilà, the bridge should work! Test out internet access or ping one.one.one.one to verify. Also, you can check the bridge with the ip addr command and see its IP configuration. Define Virtual Machines
Awesome :), we have installed the prerequisite KVM packages and configured the host network, so we can finally define the virtual machines!
Go ahead and create a directory to store VM configuration files as well as two other (sub) directories for ISOs and machine images. ISOs are the disk images that we will use to install OS’s on hosts, and the machine images are the virtual drives that store the actual VM data. I keep all of this on a RAID array as VMs can take up a lot of storage.
Also go ahead and pick which operating system/ ISO you will use. In this example I will use CentOS 8, but you can use anything else you prefer.
1
curl -o iso/CentOS-8.2.2004-x86_64-dvd1.iso http://linux.mirrors.es.net/centos/8.2.2004/isos/x86_64/CentOS-8.2.2004-x86_64-dvd1.iso
Now we will create an image for the VM (200G size in my case). I use the raw image format as it only uses as much storage on the host as the VM uses.
1
qemu-img create -f raw images/centos_8_1.img 200G
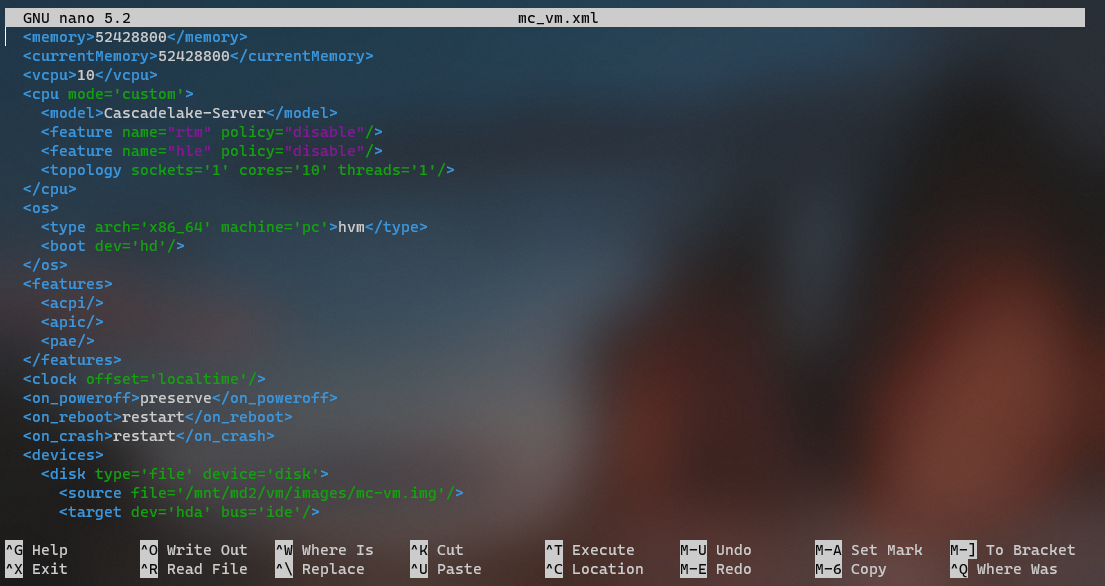
Final piece is to define the VM and specify its parameters. We will do so using an xml file with corresponding fields for each specification. Here is a corresponding centos_8_1.xml
1
2
3
4
5
6
7
8
9
10
11
12
13
14
15
16
17
18
19
20
21
22
23
24
25
26
27
28
29
30
31
32
33
34
35
36
37
38
39
40
41
42
43
<domain type='kvm'>
    <name>centos_8_1</name>
    <uuid>[________-____-____-____-____________]</uuid>
    <memory>16777216</memory>
    <currentMy>16777216</currentMemory>
    <vcpu>8</vcpu>
    <cpu mode='custom'>
      <model>Cascadelake-Server</model>
      <feature name="rtm" policy="disable"/>
      <feature name="hle" policy="disable"/>
      <topology sockets='1' cores='8' threads='1'/>
    </cpu>
    <os>
      <type arch='x86_64' machine='pc'>hvm</type>
      <boot dev='cdrom'/>
    </os>
    <features>
      <acpi/>
      <apic/>
      <pae/>
    </features>
    <clock offset='localtime'/>
    <on_poweroff>preserve</on_poweroff>
    <on_reboot>restart</on_reboot>
    <on_crash>restart</on_crash>
    <devices>
      <disk type='file' device='disk'>
        <source file='/mnt/md2/vm/images/centos_8_1.img'/>
        <target dev='hda' bus='ide'/>
      </disk>
      <disk type='file' device='cdrom'>
        <source file='/mnt/md2/vm/iso/CentOS-8.2.2004-x86_64-dvd1.iso'/>
        <target dev='hdb' bus='ide'/>
        <readonly/>
      </disk>
      <interface type='bridge'>
        <source bridge='br0'/>
        <model type='virtio'/>
        <mac address="__:__:__:__:__:__"/>
      </interface>
      <graphics type='vnc' port='3' autoport='yes' passwd='***'/>
    </devices>
</domain>
I defined a VM named “centos_8_1” with 16 GB of RAM, 8 vCPUs, and attached to the ISO, disk image, and network bridge. Note that you will also need to create a non-conflicting MAC address as well as generate a UUID. I use a python script to do so, but you can pretty much use anything as long as you won’t encounter conflicts. For graphics I am using VNC. This makes running VMs on a remote server much easier. Setting a password is good practice (and necessary for some VNC clients).
With the configuration file written, you may use virsh to parse the file and create the VM:
1
sudo virsh define centos_8_1.xml
Remember that for each VM you define, it will need its own name, UUID, and MAC address. Boot Up VM and Install OS
Let’s click the digital power button!
1
sudo virsh start centos_8_1
If you want this VM to automatically start on boot, use:
1
sudo virsh autostart centos_8_1
Let’s find which VNC port the VM started on:
1
sudo virsh vncdisplay centos_8_1
The output will resemble the localhost address with a port: 127.0.0.1:3. In my case port 3, which corresponds to 5903 (VNC starts at port 5900 by default).
If you’re using a system with a desktop environment, you can login directly using a vnc client pointed to localhost:5903. However, if running the VM on a remote server, you need to forward the server port to your local machine. In a new terminal window:
1
ssh serveruser@[IP] -L 5903:localhost:5903
Now you can connect to the remote VM display using port 5903 on your local machine. Similar to running the VM right on your local system, connect your VNC client to localhost:5903 with the password you set in the xml file.
You should now see the OS installation GUI on your screen. Follow your OS’s guided setup to install on the HD image you created earlier. Redefine VM
Now that the HD image has an operating system, we can change line 15 of the xml file to boot to the hd instead of cdrom.
1
<boot dev='hd'/>
Save the file, define the machine again, and reboot it:
1
sudo virsh define centos_8_1.xml
1
sudo virsh destroy centos_8_1
1
sudo virsh start centos_8_1
Finish Line
You now have a working VM running on a Clear Linux host! As mentioned earlier, if you want to create more VMs, you simply need to copy the VM xml file, generate a new UUID and MAC address, create a corresponding image, and install the OS as we did here. Of course, feel free to change any other parameters as you see fit (for example, amount of memory or cpu allocation).
Hopefully this has helped!